Introduction
As a class, Professor Hupy discussed the development of a geodatabase and its importance in developing a good geodatabase before heading out into the field. This lab was set up to prepare the class individually to be able to use ArcPad in the field to collect data on the micro climate of the campus. In order to properly collect the data, the class needed to have the background to effectively collect the data. This was especially important because the data will need to be collected in a short period of time so that time does not play a factor in understanding the campus micro climate. In addition, if one does not have all of the fields available when in the field, it will make it much more difficult for the user to manipulate the data once back in the lab.
Part 1
In order to create a microclimate analysis, one needs to take the time to plan and prepare before going out into the field. This includes having the tools to do such. For this lab we will be using a Trimble Juno GPS (see figure 1). A single feature class will be created for the microclimate analysis. This is much simplier than having a feature class created for every attribute. Data entry and analysis becomes much easier when the data is located under one feature class.
When developing a geodatabase, one must consider what various subcategories fall under the definition of a microclimate. A microclimate is considered a very small area that varies in temperature, humidity, and surface type to name a few factors.We will be considering temperature at the surface, temperature at two meters, windchill, dewpoint, humidity (%), wind direction, wind speed, ground cover, and notes. Having this variety of attributes will give us a solid understanding of the variation of the climate of the campus.
As mentioned later in the lab, setting appropriate domains before going out in the field is the make or break it point in having a successful field and data input experience. The above attributes require to be set up with their own domains to place limits on the data entered in the field. For example, having a range of -100 to 100 degree Fahrenheit for the temperature attribute does not make sense because Wisconsin in March rarely gets above 50 degrees. Therefore, setting a more realistic domain will minimize the likelihood for errors when manually entering the information into the Juno.
Part 2
Methods
Step 1- Construction of a Geodatabase
There is a great amount of planning that needs to occur on a desktop compter before one goes out into the field with a Trimble Juno equip with ArcMap. First go into ArcCatalog and create a file geodatabase by right clicking on the folder you would like to place the data in. This will be where your feature classes, with all of its fields, will be stored (see figure 2).
Step 2- Development of Geodatabase Domains
This is where you will build your domains. Domains are the location in which one sets up the parameters for the data entry. From the domain, one can create the field name within a feature class. By integrating multiple fields within one feature class, the data can be viewed in a much more concise manner, and it is much easier to separate specific fields into layers rather than the other way around.
To edit domains, right click on your file geodatabase and click on 'properties'. The 'domain' tab is where the entry process will start. First, one will enter the name of the desired domain (as established in the pre-planning), and then create the description it. It is important to be thorough, because it may make sense to you, but it might not make sense to someone else in the future (see figure 2).
Step 3- Development of Domain Ranges
There are two domain types that one can create for their data. One is range, which allows the user to set restrictions on the data input capabilities. These domains are all using numerical quantities. The data for this lab was mostly in range form, which includes 'Humidity (%)', 'Temperature', 'Wind Direction', and 'Wind Speed'. The other type of domain is text. This allows you to enter sub-categories in the domain field type. The domain type in this lab that contains text is the 'Ground Cover' domain. The ground cover text is added in the 'coded values'. Here grass, snow, concrete, black top, open water, gravel, sand, and other codes are added all with their own separate descriptions (see figure 3).
In addition, one must set the field type based on the domain type chosen. A domain type of range has a variety of field type options to choose from including short integer, long integer, float, and double. All have various numerical capabilities listed below (see figure 4).
The Excel document below gives an overall view of the domains and their parameters (see figure 5).
Step 4- Construction of a Feature Class for Later Deployment to ArcPad
Creating a feature class is simple comparatively to the process of developing domains. To create a feature class, go into ArcCatalog, and right click on the file feature class that contains the domain information (mc_moothaea.gdb) (see figure 6). Then select 'new', 'create feature class' and set the name of the feature class, and coordinate system.
Then begin the entry of the field name and its data type as seen below in figure 7.
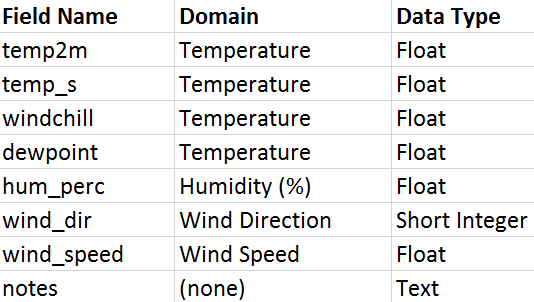
An important note is that the domain for the individual fields are created here by setting the data type, which must match the domain's data type (e.g. float, text, short integer) that was developed during the domain's creation. Through this process, the attributes are connected to the domains. The field name for the feature class differs from the field name of the domain type in that there can be multiple feature class field names that contain the same domain. For example, the 'temp_s', 'temp_2m', 'windchill', 'dewpoint', 'hum_perc' are all different feature class fields, but they have the same domain, temperature which is set to -30 -60. This means that none of these fields's input numbers can exceed -30-60. This is because they are all related to temperature and it would not make sense to have individual domains set up for each field type.This minimizes the likelihood of error in the data entry (see figure 8).
Step 5- Importation of a Raster Background Data Set
A detailed base map is important to include for this lab so that when zoomed in, the imagery is not pixilated. This was found in the geospatial database found on the UWEC computers. This particular basemap is called City_Eau_Claire_3in_2013 (see figure 9).
Discussion
Some people in the class experienced different difficulties while creating their domains. By talking with these people about their issues, I feel that I will be able to prevent running into these issues later. One of the major issues that I ran into was not having one of my field names show up in the attribute table after creating the feature class. Professor Hupy was also having difficulties figuring out what I had done wrong, and so I decided to create a new .mxd file and re-import the feature class. After doing something this simple, all of the field names appeared. I learned that ArcMap can be very fussy and more often than not, there is either a slight error by the user, or just a glitch in the system. Patience is key to using ArcMap and already I have gained quite a bit of that in class.
We were also told to be very specific in creating a description of the domain. This was to ensure that if people were using our data in the future, that they would be able to understand the logistics of each of our domains to be able to replicate the domain or take our information and analyze its output. I know sometimes I struggle with explaining ideas effectively, but it is absolutely vital in order to collect data to be used for the future.
Conclusion
Developing a geodatabase can seem like a minimal task, but when it involves going out in the field and using the pre-determined domains and attributes, one does not want to miss a component. Taking time to think about the parameters and requirements prior to going out into the field will make the rest of the process much easier, even if it does seem to be a nuisance in the lab before going out into the field.
In order to create a microclimate analysis, one needs to take the time to plan and prepare before going out into the field. This includes having the tools to do such. For this lab we will be using a Trimble Juno GPS (see figure 1). A single feature class will be created for the microclimate analysis. This is much simplier than having a feature class created for every attribute. Data entry and analysis becomes much easier when the data is located under one feature class.
 |
| Figure 1. This is the Trimble Juno GPS that will be used in the data collection during this lab. It has the capabilities of an ArcPad application which allows for data collection directly in to the mobile version of ArcMap. |
When developing a geodatabase, one must consider what various subcategories fall under the definition of a microclimate. A microclimate is considered a very small area that varies in temperature, humidity, and surface type to name a few factors.We will be considering temperature at the surface, temperature at two meters, windchill, dewpoint, humidity (%), wind direction, wind speed, ground cover, and notes. Having this variety of attributes will give us a solid understanding of the variation of the climate of the campus.
As mentioned later in the lab, setting appropriate domains before going out in the field is the make or break it point in having a successful field and data input experience. The above attributes require to be set up with their own domains to place limits on the data entered in the field. For example, having a range of -100 to 100 degree Fahrenheit for the temperature attribute does not make sense because Wisconsin in March rarely gets above 50 degrees. Therefore, setting a more realistic domain will minimize the likelihood for errors when manually entering the information into the Juno.
Part 2
Methods
Step 1- Construction of a Geodatabase
There is a great amount of planning that needs to occur on a desktop compter before one goes out into the field with a Trimble Juno equip with ArcMap. First go into ArcCatalog and create a file geodatabase by right clicking on the folder you would like to place the data in. This will be where your feature classes, with all of its fields, will be stored (see figure 2).
 |
| Figure 2. This is what one sees in ArcCatalog when accessing and creating their file geodatabase. This one is titled 'mc_moothaea.gdb'. |
Step 2- Development of Geodatabase Domains
This is where you will build your domains. Domains are the location in which one sets up the parameters for the data entry. From the domain, one can create the field name within a feature class. By integrating multiple fields within one feature class, the data can be viewed in a much more concise manner, and it is much easier to separate specific fields into layers rather than the other way around.
To edit domains, right click on your file geodatabase and click on 'properties'. The 'domain' tab is where the entry process will start. First, one will enter the name of the desired domain (as established in the pre-planning), and then create the description it. It is important to be thorough, because it may make sense to you, but it might not make sense to someone else in the future (see figure 2).
 |
| Figure 2. Here are the domains set for this lab. These are the aspects of the microclimate that were set up during the pre-planning process. |
Step 3- Development of Domain Ranges
There are two domain types that one can create for their data. One is range, which allows the user to set restrictions on the data input capabilities. These domains are all using numerical quantities. The data for this lab was mostly in range form, which includes 'Humidity (%)', 'Temperature', 'Wind Direction', and 'Wind Speed'. The other type of domain is text. This allows you to enter sub-categories in the domain field type. The domain type in this lab that contains text is the 'Ground Cover' domain. The ground cover text is added in the 'coded values'. Here grass, snow, concrete, black top, open water, gravel, sand, and other codes are added all with their own separate descriptions (see figure 3).
 |
| Figure 3.This is the screen found after right clicking on the file geodatabase under 'Properties'. |
 |
| Figure 4. This is a description of the data types that can be used for numerical domains. For this lab, short integer and float were the desired data types. |
The Excel document below gives an overall view of the domains and their parameters (see figure 5).
 |
| Figure 5. Data inputted into ArcCatalog. This is an Excel spreadsheet of what is all entered into the domains within the file geodatabase in figure ___. |
Creating a feature class is simple comparatively to the process of developing domains. To create a feature class, go into ArcCatalog, and right click on the file feature class that contains the domain information (mc_moothaea.gdb) (see figure 6). Then select 'new', 'create feature class' and set the name of the feature class, and coordinate system.
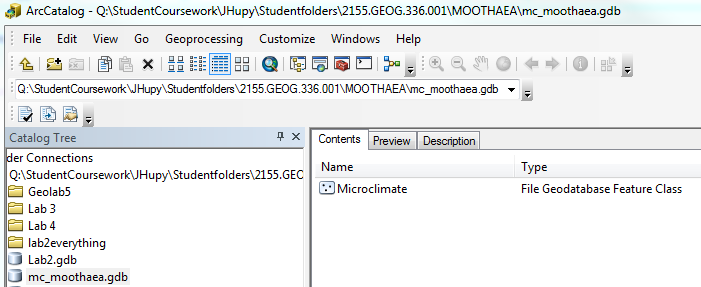 |
| Figure 6. This is the contents of the 'mc_moothaea.gdb'. 'Microclimate' is the file geodatabase feature class that contains all of the domains and fields that are needed to go out into the field and record data. |
Then begin the entry of the field name and its data type as seen below in figure 7.
 |
| Figure 7. This screen is found within the feature class properties which can be accessed by right clicking the file geodatabase feature class 'Microclimate' under the 'Fields' tab. Within this tab, one can set the field name that will appear in the attribute table. The domain for the individual fields is created here by setting the data type, which must match the domain's data type (e.g. float, text, short integer) that was developed during the domain's creation. |
An important note is that the domain for the individual fields are created here by setting the data type, which must match the domain's data type (e.g. float, text, short integer) that was developed during the domain's creation. Through this process, the attributes are connected to the domains. The field name for the feature class differs from the field name of the domain type in that there can be multiple feature class field names that contain the same domain. For example, the 'temp_s', 'temp_2m', 'windchill', 'dewpoint', 'hum_perc' are all different feature class fields, but they have the same domain, temperature which is set to -30 -60. This means that none of these fields's input numbers can exceed -30-60. This is because they are all related to temperature and it would not make sense to have individual domains set up for each field type.This minimizes the likelihood of error in the data entry (see figure 8).
|
A detailed base map is important to include for this lab so that when zoomed in, the imagery is not pixilated. This was found in the geospatial database found on the UWEC computers. This particular basemap is called City_Eau_Claire_3in_2013 (see figure 9).
 |
| Figure 9. This is what ArcMap looks like once the feature class and raster base map have been added. This is also the extent of the mapping region that will take place out in the field. |
Discussion
Some people in the class experienced different difficulties while creating their domains. By talking with these people about their issues, I feel that I will be able to prevent running into these issues later. One of the major issues that I ran into was not having one of my field names show up in the attribute table after creating the feature class. Professor Hupy was also having difficulties figuring out what I had done wrong, and so I decided to create a new .mxd file and re-import the feature class. After doing something this simple, all of the field names appeared. I learned that ArcMap can be very fussy and more often than not, there is either a slight error by the user, or just a glitch in the system. Patience is key to using ArcMap and already I have gained quite a bit of that in class.
We were also told to be very specific in creating a description of the domain. This was to ensure that if people were using our data in the future, that they would be able to understand the logistics of each of our domains to be able to replicate the domain or take our information and analyze its output. I know sometimes I struggle with explaining ideas effectively, but it is absolutely vital in order to collect data to be used for the future.
Conclusion
Developing a geodatabase can seem like a minimal task, but when it involves going out in the field and using the pre-determined domains and attributes, one does not want to miss a component. Taking time to think about the parameters and requirements prior to going out into the field will make the rest of the process much easier, even if it does seem to be a nuisance in the lab before going out into the field.
No comments:
Post a Comment